Following on from the previous series I have updated and released the TypeScript generator as a nuget package.  It’s now much easier to integrate into your build and it supports generation of Web API action methods, and SignalR hubs.

For more info, check the readme on https://github.com/slovely/TypeScriptDefinitionsGenerator.  I hope to find the time to add more documentation soon, but please ask questions on github if you have problems.

This is a series of posts about TypeLite/TypeScript. The parts are:

Part I: TypeLite has gone v1.0 - Video demonstrating what we are doing

Part II: Using TypeLite to Generate TypeScript - Building the TypeScript generator

Part III (this part): Generating TypeScript at build-time using TypeLite - Automatically regenerating the TypeScript on each build

Well, it’s been over a year since I started a series on using TypeLite for improving the type-safety of your client side code.  At least no one reads this, so it doesn’t matter!  This is now part III.  On the plus side, it does mean that over a year later I’m still using this technique in a number of applications that have gone live, and it’s proved it’s worth.

In the previous episode, we had a solution setup in which we could regenerate our TS interfaces by running a command.  Now to make it generate on each build.

Step One

First step, we need to copy the TypeScriptGenerator EXE to a sensible location.  Unfortunately running it from the location it’s built in can cause file locking issues with VisualStudio.  As this project doesn’t change very often, I add a simple batch file to the project like this (see this commit):

copy bin\debug\*.dll ..\Tools
copy bin\debug\*.exe ..\Tools
del ..\Tools\*.vshost.exe
pause

*Note, I use the VSCommand extensions (http://vscommands.squaredinfinity.com/) which add a ‘Run’ option on the solution explorer context menu for batch files, making this workflow ok with me.  Currently I’m committed the cardinal sin of then checking this ‘Tools’ folder into git with the required binary exe/dlls.  Feel free to move this step to your build script so that you can avoid this.

Step Two

Now we need to call the generator each time the solution is compiled.  Initially I used Build Events to do this, but I learned that these fire at a different time if you run instead Visual Studio compared to running outside using MSBuild, so it had trouble when building on a Build Server.  After quite a bit of trial and error, I settled on using an MSBuild extensibility point – add this to the csproj file of your Web project (see this commit):

<Project>
  <!-- the rest of the project file -->
  <Target Name="AfterResolveReferences">
    <Exec Command="..\Tools\TypeScriptSample.Generator.exe ..\TypeScriptSample.Models\bin\$(ConfigurationName)\TypeScriptSample.Models.dll          $(ProjectDir)App\server" WorkingDirectory="$(ProjectDir)" />
  </Target>
</Project> 

AfterResolveReferences runs at the perfect time for us.  The references for the Web project have been pulled in, so the DLL containing the c# model classes will be in the \bin folder, but it’s before the web project itself is built – so any client-side errors introduced by the updated TypeScript (e.g. a property is renamed) will be reported as usual and prevent the build from succeeding.  The command call is just the same command that we were running manually in part two.

The final result

Now, if we rename a property in the c# code: \ image

All we have to do is build, and any TypeScript that references the old property name will appear as an error!

image

In the year since I started this series, the version of the generator I’m using actually does a lot more than just convert c# models into TS interfaces – it generates typed SignalR hubs, and also creates type-safe TypeScript method calls for WebAPI actions, allowing you to call your server-side methods from the client with intellisense for action parameters, etc.  I’m hoping I’ll be able to tidy that up and add it to this series of posts.

This is a series of posts about TypeLite/TypeScript. The parts are:

Part I: TypeLite has gone v1.0 - Video demonstrating what we are doing

Part II (this part): Using TypeLite to Generate TypeScript - Building the TypeScript generator

Part III: Generating TypeScript at build-time using TypeLite - Automatically regenerating the TypeScript on each build

With webpages becoming more interactive and feature-rich by the day, like most developers, I’m finding more and more of my code I write is client-side.  I’m already leveraging TypeScript to provide type-safety across as much of the client code as possible, but there is still a disconnect between the TypeScript on the client, and the c# on the server.  If a property is renamed on the server, the compiler won’t help me find all the places in the JavaScript that I’ve not updated (yes, yes, of course ReSharper can help with this, but it’s not perfect).

There must be a better way…

What I really want is when a property is changed (renamed, deleted, whatever) on an object that is serialised to the client, when I rebuild I want to see any errors that it has caused in the client code.

One weird trick for success…

Having recently worked on a large Single Page Application, I introduced a library called TypeLite which enabled us to generate TypeScript definitions for all the c# classes that were passed over the wire.  The default use of TypeLite uses a T4 template to generate the TS (if you want to see the normal T4 usage, read the docs).

However, this didn’t quite do what I wanted (and I just don’t like T4) so I created a console app and using the TypeLite API directly. 

Here’s what I did…

(You can follow along with my example using the repository at https://github.com/slovely/TypeScriptSample.  The starting point for the example is this commit.)

First, you’ll need to separate the objects that are sent/received by your MVC/WebAPI actions (or, if you are crazy, your WebForms [WebMethod] decorated static methods.  You weirdo) into an assembly separate from your web project.  So in my example code, I have a web project called TypeScriptSample.Web and a class library called TypeScriptSample.Models.  Anything that I’m passing to/from the client/server is moved to the Models project (in my project, that’s just one item, Person).  [If you are following along see this commit.])

Next, create a new console application and use Nuget to add package TypeLite.Lib (it might be easier to do this in a separate solution).  This app is going to take in two parameters – the path to the assembly containing your models, and a path to place the generated TypeScript.  Sample code for this is here, but be warned this is very rudimentary and contains no error checking, etc.  This sample takes two parameters, first one is the path of the ‘TypeScriptSample.Models’ assembly and the second is a path for the generated TypeScript.  This should be a path in your web project.  [See this commit.]

using System;
using System.IO;
using System.Reflection;
using TypeLite;

namespace TypeScriptSample.Generator
{
    class Program
    {
        static void Main(string[] args)
        {
            var assemblyFile = args[0];
            var outputPath = args[1];

            LoadReferencedAssemblies(assemblyFile);
            GenerateTypeScriptContracts(assemblyFile, outputPath);
        }

        private static void LoadReferencedAssemblies(string assemblyFile)
        {
            var sourceAssemblyDirectory = Path.GetDirectoryName(assemblyFile);
            foreach (var file in Directory.GetFiles(sourceAssemblyDirectory, "*.dll"))
            {
                File.Copy(file, Path.Combine(AppDomain.CurrentDomain.BaseDirectory, new FileInfo(file).Name), true);
            }
        }

        private static void GenerateTypeScriptContracts(string assemblyFile, string outputPath)
        {
            var assembly = Assembly.LoadFrom(assemblyFile);
            // If you want a subset of classes from this assembly, filter them here
            var models = assembly.GetTypes();

            var generator = new TypeScriptFluent()
                .WithConvertor<Guid>(c => "string");

            foreach (var model in models)
            {
                generator.ModelBuilder.Add(model);
            }

            //Generate enums
            var tsEnumDefinitions = generator.Generate(TsGeneratorOutput.Enums);
            File.WriteAllText(Path.Combine(outputPath, "enums.ts"), tsEnumDefinitions);
            //Generate interface definitions for all classes
            var tsClassDefinitions = generator.Generate(TsGeneratorOutput.Properties | TsGeneratorOutput.Fields);
            File.WriteAllText(Path.Combine(outputPath, "classes.d.ts"), tsClassDefinitions);

        }
    }
}

To run the console app on the sample application, the command line is:

TypeScriptSample.Generator.exe ..\\..\\..\\TypeScriptSample.Models\\bin\\debug\\TypeScriptSample.Models.dll ..\\..\\..\\TypeScriptSample.Web\\App\\server

image…which produces two files in the web project (after you’ve run the command for the first time, click show all files and include them in the web project).  [See this commit for the results]

Open the classes.d.ts and you’ll find a definition of the Person object from our Models assembly, and inside enums.ts their is a translation of the server-side MaritalStatus enum!

Putting this to use

In the web application there’s a simple TypeScript file that retrieves a list of Person objects from a WebAPI controller using ajax.  The current version of this looks like:

function getPeople() {
    $.ajax({
        url: "api/person",
        method: 'get',
        // response could be anything here
    }).done((response) => {
        var details = '<ul>';
        for (var i = 0; i < response.length; i++) {            //If 'Name' gets changed on the server, this code will fail 
            details += "<li>" + response[i].Name + "</li>";
        }
        details += '</ul>';
        $('#serverResponse').html(details);
    }).fail();
}

Now we can update the ‘done’ function to tell the TypeScript compiler that the response from the server will be an array of Person objects.  Then we get a great intellisense experience, as you can see below [see this commit]

image

That’s the basics done… However, if we add or rename a property on our server model, we have to manually re-run the generator app to get the TypeScript in sync.  Next time I’ll demonstrate how to integrate this as part of your build process so that your TypeScript definitions are updated whenever the c# classes are modified.

This is a series of posts about TypeLite/TypeScript. The parts are:

Part I (this part): TypeLite has gone v1.0 - Video demonstrating what we are doing

Part II: Using TypeLite to Generate TypeScript - Building the TypeScript generator

Part III: Generating TypeScript at build-time using TypeLite - Automatically regenerating the TypeScript on each build

I’ve been doing a lot of work with JavaScript for the last couple of years and have really found TypeScript to help when working on a larger application (particularly in a team environment).  However, it doesn’t help with the disconnect between client-code and server-code.  If your server code is written in .NET, I’d highly recommend checking out an awesome library from Lukas Kabrt called TypeLite.  This library enables you to generate TypeScript definitions automatically from your server-side code!  Check out the nuget package now!

From the website:

TypeLITE is a utility that generates TypeScript definitions from .NET classes. It supports all major features of the current TypeScript specification, including modules and inheritance.

I am happy to say I was able to add support for a reasonable support of generics and Lukas has merged my changes in and updated the version number to v1!  To give an idea of what you can do with this I created this short video (apologies for the production qualities – please ensure you pick 720p resolution, for some reason 1080p is grainy!!)


My next post will document how I achieved this, and then I’ll document how to wire it into your build process.

Recently I needed the ability to modify the current database for an application at runtime.  There are lots of ways of doing this, for example the IDbConnection interface defines the ChangeDatabase method allowing you to do just that.  Alternatively, you will have abstracted away your connection object behind a factory or inject it in using your favourite IoC tool.

However, I was faced with some old code that created the SqlConnection object as needed in hundreds of different places, and didn’t have the opportunity to go through and replace all of these references, so looked at modifying the ConfigurationManager.ConnectionStrings collection directly.  I thought that would be easy enough, but the base ConfigurationElement class has a read-only flag preventing modification.  There’s always a way though… as long as you use reflection you can indeed modify the connection string!

//Update the readonly flag to false, using reflection:
var settings = ConfigurationManager.ConnectionStrings["MyConnectionName"];
var fieldInfo = typeof(ConfigurationElement).GetField("_bReadOnly", BindingFlags.Instance | BindingFlags.NonPublic);
fieldInfo.SetValue(settings, false);

//Create a connection string builder as it makes it easy to modify just the DB name:
var builder = new SqlConnectionStringBuilder(ConfigurationManager.ConnectionStrings["MyConnectionName"].ConnectionString);
builder.InitialCatalog = dbName;  //You can also change, server, user, password, etc here, if required
//Update the connection string setting:
settings.ConnectionString = builder.ConnectionString;

Any new connections created after this will use the new connection string!  In my case, only the database name needed to be changed, so I only set the InitialCatalog, but you can set anything else you need as well.

Note that this is NOT a sensible way to do things – accessing private data can break in future releases or cause unintended side-effects.  In my case however, this code was only used for debug builds (and wrapped in #if DEBUG…) so it was good enough, YMMV.

Recently a client needed to migrate a large TFS repository to a new machine, and to a later version of TFS.  They tried to follow the Microsoft procedure but had problem with that (different OS versions, security settings, that sort of thing).  In the end they decided to just ‘Get Latest’ from the old repo and commit that into the new one, losing all the history of the source code.

As retrieving history / comparing old versions of code, is one of the main jobs of a source code provider, I suggested using GIT-TF to do the migration.  After a fair bit of googling I had a stab at doing the import.  As it took me a few attempts and none of the instructions were quite right (at least in our scenario) I thought I’d post a demo of the complete instructions here. (Prerequisites – you must have a working GIT prompt and have successfully installed GIT-TF.  These instructions assume that you are using GIT Bash).

Current TFS Repositories

Our two TFS histories look like this (Old on the left, new on the right).  Of course, in reality the history on the left would be much bigger.  Notice that the latest commit on the new repository is removing all the files that TFS automatically adds – the build process templates etc.  You should also do this, as we want to start with the new repository empty. image

image

Our new TFS server looks the same, but has no history apart from the auto-generated check-in’s of the TF Build Automation and template files.  You should delete this files from the New TFS repository now (and remember to check-in the deletes!).

Clone the TFS repository’s to GIT

Run these commands in a GIT prompt:

cd c
mkdir git
cd git
git tf clone http://myoldserver:8080/tfs $/OldTfs --deep
git tf clone http://mynewserver:8080/tfs $/NewTfs --deep

This will create two new GIT repositories under c:\git called OldTfs and NewTfs.  The NewTfs git repository should be empty, as per your new TFS repository.  Running git log on the OldTfs git repo should display your complete TFS checkin history.

git-tf
file

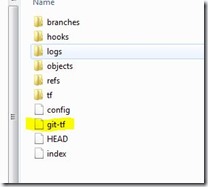
Now, as we need to pull in the ‘old’ GIT repository to the new one, we need to remove the details of the new TFS changesets that we’ve already pulled into the GIT repo.  To do that, remove the file “git-tf” from the “.git” folder in c:\git\NewTfs.

Now we need to re-create the link to the new server (but without the changeset details), so run this command:

cd c/git/NewTfs 
git tf configure http://mynewserver:8080/tfs $/NewTfs

Pull in the old GIT repository and push to new TFS

Next we need to add the old GIT repo as a remote in the new one, and then pull from it.  The important option is to specify “–rebase” to ensure that the full commit history is pulled across:

git remote add master file:///c/git/OldTfs
git pull --rebase master master

Running “git log” should now display the full history of your old TFS repository in the new GIT repo, so the only step left is to push this to your new TFS server:

git tf checkin --deep

Remember the “–deep” option or only the latest changeset will be committed.  Once this is finished, you should be able to see your full TFS history displayed in the Source Control Explorer on your new server!

Wow, well over 3 years since a blog post!

I recently needed to create a form containing multiple buttons.  Normally, I use a variation of this technique to know which button is clicked, and have each handled by a different action method.  However, on this occasion the button was actually the same button repeated for a list of entities, so mapping by name wasn’t good enough – each button was named “edit”.  I needed a way to know which edit button was pressed.  In this instance having a <form> for each button plus a hidden input specifying which entity was being edited wasn’t acceptable – each entity also had other input controls that needed to be submitted as one, and had to work without JavaScript.

So I created MultiButtonExAttribute (an MVC ActionNameSelector) which matched only on the prefix of the button name, and used the rest of the name to store state information.  All you have to do is create input buttons using this pattern:

<input type="submit" name="edit_id:1234_other:somestring" value="Edit" />

Where the name is made up of a prefix (“edit”), then a separator (“_”), then key/value pairs of data separated by a colon.  Each key/value pair is then separated by another underscore.  On the server-side, create an action method to handle the form submit and decorate it like this:

[MultiButtonEx("edit")]
[HttpPost]
public ActionResult EditEntity(int id, string other)
{
    //TODO: whatever needs to be done
    //The ID will be parsed for you by the DefaultModelBinder
    //and in this case will have the integer value 1234
}

Note that the key/value pairs take part in the normal model binding, so are passed type-safe to the parameters of the action method.

To make the submit button easier to render, I also created a HtmlHelper which ensures the ‘name’ attribute is generated correctly:

@Html.MultiButtonEx(new {id = item.Id, other = item.Other}, "edit", "Click Me!")

Which will translate the anonymous object into the correct format.

NOTE: The code on github is an example and not production ready – you’ll no doubt want to beef up the error handling, move the separator characters into consts and encode those characters if they appear in your data, etc.  Also, I’m sure there’s no doubt a limit on the length of a HTML name attribute (which probably just for fun varies across browsers).

I am also not even sure this is a good idea – if anyone can think of a better way to achieve this please let me know!!

More info on github repository.

This week I upgraded a web service project to v3.5 of the .Net framework.  However, another website then stopped working as it called the web service using JavaScript (by referencing the client-side proxy created by the Microsoft Ajax Library).  After a little bit of debugging I found that the response from a 3.5 webservice is different to a v2.0 service.  My webservice just returned a Guid.  When the service was using v2.0 the response just contained a guid.  Once it was upgraded to v3.5 however, it returned an JSON object with a property called ‘d’ and the value of ‘d’ was the guid.

How to fix

There are a couple of ways to get around this problem.  The easiest is probably to just upgrade the website to 3.5 as well, as then the serialisation of the object will be done for you automatically.  However, this wasn’t an option for me.  Instead I modified my JavaScript callback method to work with either response format.  The code changed from this:

function onCallback(result, context)
{
    var guid = result;
    //do further processing here...
}

to this:

function onCallback(result, context)
{
    var guid = result.d ? result.d : result;
    //do further processing here...
}


All we are doing is checking for the existence of the ‘d’ property and either getting the result from there or just using the result itself.  The benefit of this simple change is that the callback method will continue to work for any combination of v2.0 and v3.5 websites and services.

Hopefully this will be useful for somebody!  Posting it here so that I don’t forget about it myself in the future!

I’ve been playing with a little bit of TDD with FluentNHibernate and the MVC Framework lately and I had a few issues trying to get unit tests running with an in-memory SQLite database.  There are quite a few blogs describing how to do this but none of them use FluentNHibernate, so I thought I’d document the way I achieved this.  I’m not sure that this is the best way, so if anyone has a better idea please let me know.

I started off with this class to configure my mappings:

public class NHibernateMapping
{
    public ISessionFactory BuildSessionFactory()
    {
        return Fluently.Configure()
            .Database(SQLiteConfiguration.Standard.InMemory())
            .Mappings(
                o => o.AutoMappings.Add(
                    AutoPersistenceModel.MapEntitiesFromAssemblyOf<MyDummyEntity>()
                        .WithSetup(a =>
                            {
                                a.IsBaseType = ty => ty.FullName == typeof(DomainEntity).FullName;
                                a.FindIdentity = prop => prop.Name.Equals("Id");
                            }
                        )
                )
            )
        .BuildSessionFactory();
    }
}

At first this worked absolutely fine for my tests.  However, no where in here is the schema for the database actually defined.  My initial tests passed only because they were creating, loading and saving objects in the same NHibernate session so they weren’t actually hitting the database!  NH could supply everything from it’s level 1 cache.  When I wrote a test to check that an action worked as expected when an invalid ID was specified it failed with an ADOException from NH – because it now tried to read a row from the database but the table didn’t exist!

I then changed my NHibernateMapping class to call SchemaExport, but the test still failed because SchemaExport creates the schema and then closes the connection.  This destroys the in-memory database so when my test read the table didn’t exist again!

From this post I found a connection provider which ensured that the same connection would always be used.  The code for this class is:

public class SQLiteInMemoryTestConnectionProvider :
    NHibernate.Connection.DriverConnectionProvider
{
    private static IDbConnection _connection;

    public override IDbConnection GetConnection()
    {
        if (_connection == null)
            _connection = base.GetConnection();
        return _connection;
    }

    public override void CloseConnection(IDbConnection conn)
    {
    }

    /// <summary>
    /// Destroys the connection that is kept open in order to 
    /// keep the in-memory database alive.  Destroying
    /// the connection will destroy all of the data stored in 
    /// the mock database.  Call this method when the
    /// test is complete.
    /// </summary>
    public static void ExplicitlyDestroyConnection()
    {
        if (_connection != null)
        {
            _connection.Close();
            _connection = null;
        }
    }
}

I then modified the NHibernateMapping class to expose the NH configuration and session factory separately, and also allow the IPersistenceConfigurer to be passed it (so that I could use a different database for testing and live).  The class now looks like this:

public class NHibernateMapping
{

    IPersistenceConfigurer _dbConfig;

    public NHibernateMapping(IPersistenceConfigurer dbConfig)
    {
        _dbConfig = dbConfig;
    }

    public Configuration BuildConfiguration()
    {
        return Fluently.Configure()
            .Database(_dbConfig)
            .Mappings(
                o => o.AutoMappings.Add(
                    AutoPersistenceModel.MapEntitiesFromAssemblyOf<MyDummyEntity>()
                        .WithSetup(a =>
                            {
                                a.IsBaseType = ty => ty.FullName == typeof(DomainEntity).FullName;
                                a.FindIdentity = prop => prop.Name.Equals("Id");
                            }
                        )
                )
            )
        .BuildConfiguration();
    }

    public ISessionFactory BuildSessionFactory()
    {
        return BuildConfiguration().BuildSessionFactory();
    }

}

Then, in the test setup, I just need to tell FluentNH to use my test connection provider, call SchemaExport, and create my SessionFactory:

[TestInitialize]
public void Init()
{
    var mapping = new NHibernateMapping(
        SQLiteConfiguration.Standard.InMemory()
            .Provider<SQLiteInMemoryTestConnectionProvider>());
    new NHibernate.Tool.hbm2ddl.SchemaExport(m.BuildConfiguration())
        .Execute(true, true, false, true);
    _sessionFactory = m.BuildSessionFactory();
}

As I said, I’m not sure if this is the best way to achieve this, so if someone has a more elegant solution please let me know.

UPDATE: This patch was finally accepted!

While using the UpdatePanelAnimationExtender control from the Ajax Control Toolkit I decided that I didn’t like the behaviour of the control.  My issue was that I had a update panel that I wanted to ‘collapse’ when an async postback started, and expand again once the postback had completed.  If you view the controls’s sample page you can see this effect in operation.  However, if the postback finishes before the ‘collapse’ animation has finished, the animation is aborted and the update panel will ‘jump’ to a height of zero before expanding again.  I wanted the collapse animation to finish regardless of how quickly the server returned to ensure that the animation always appeared smoothly.

The way this is achieved on the sample page is by having a call to Thread.Sleep in the PageLoad method.  I didn’t really want to waste resources on the server just to ensure a client-side animation appeared smoothly, so I set about writing a patch for the control.

Looking at the JavaScript behaviour for the control it was obvious why the control behaved the way it did.  This is the JavaScript code fired when the async postback has completed:

    _pageLoaded : function(sender, args) {
        /// <summary>
        /// Method that will be called when a partial update (via an UpdatePanel) finishes
        /// </summary>
        /// <param name="sender" type="Object">
        /// Sender
        /// </param>
        /// <param name="args" type="Sys.WebForms.PageLoadedEventArgs">
        /// Event arguments
        /// </param>
        
        if (this._postBackPending) {
            this._postBackPending = false;
            
            var element = this.get_element();
            var panels = args.get_panelsUpdated();
            for (var i = 0; i < panels.length; i++) {
                if (panels[i].parentNode == element) {
                    this._onUpdating.quit();
                    this._onUpdated.play();
                    break;
                }
            }
        }
    }

As you can see, once this method is called the _onUpdating animation is cancelled immediately by the call to the quit() method.  What I needed was a way to check that the animation has finished before playing the _onUpdated animation, and if not, wait until it has finished.  The first part was easily accomplished with a simple if:

if (this._onUpdating.get_animation().get_isPlaying()) {}

The second part – waiting till it had finished – proved a bit harder however.  My initial thought was to use window.setTimeout to check later if the animation had finished.  However, the function supplied to setTimeout runs in the context of the ‘window’ object, so I didn’t have a reference to the this._onUpdated or this._onUpdating private variables.  A quick Google lead me to this page by K. Scott Allen which describes the use of the call() and apply() methods in JavaScript.  These methods are actually on the *function* object itself and allow us to alter what ‘this’ refers to in a method call.  Very powerful – and definitely dangerous too – but exactly what I needed.  I added a new private method to the JavaScript class called _tryAndStopOnUpdating as follows:

    _tryAndStopOnUpdating: function() {
        if (this._onUpdating.get_animation().get_isPlaying()) {
            var context = this;
            window.setTimeout(function() { context._tryAndStopOnUpdating.apply(context); }, 200);
        }
        else {
            this._onUpdating.quit();
            this._onUpdated.play();
        }
    }

Firstly, this method checks if the first animation is still playing, and if so uses window.setTimeout to wait 200ms before calling itself to check again.  The use of ‘apply’ here ensures that when the method is called again the ‘this’ keyword refers to our JavaScript class as expected.  Note that if I hadn’t saved ‘this’ to a local variable and just referred to ‘this’ in the function passed to window.setTimeout, then the call would fail as ‘this’ would then refer to the JavaScript window object itself.

All that remained was to add a new property to the server control to allow this alternative behaviour to be switched on or off and to modify the body of the _pageLoaded method to call my new method like so:

        if (this._postBackPending) {
            this._postBackPending = false;
            
            var element = this.get_element();
            var panels = args.get_panelsUpdated();
            for (var i = 0; i < panels.length; i++) {
                if (panels[i].parentNode == element) {
                    if (this._AlwaysFinishOnUpdatingAnimation) {
                        this._tryAndStopOnUpdating();
                    }
                    else {
                        this._onUpdating.quit();
                        this._onUpdated.play();
                    }
                    break;
                }
            }
        }


You can see an example of this modified UpdatePanelAnimationExtender here.  The bottom checkbox controls whether the first animation will always complete before the second one starts.  Hopefully you’ll be able to see how much smoother the animation is with the bottom checkbox checked!

Unfortunately this patch hasn’t made it into the control toolkit yet, so if you would like to see it in there please vote for my patch here.  Thanks!